Create a Report by Adding Links
5 mins read - Updated on Nov 15, 2026You can create a Report from a link by pasting the address of a public page, such as a product page, an app page or a business profile, into Kimola. Kimola collects the reviews and comments listed on that page, classifies them with the models you choose and answers the Dimensions you select, so the Report shows what customers say about that one product, app or place. You can add several links to the same Report to analyze competitors, branches or platforms together.
This method fits when you already know which pages you want to study: a specific product, a location or a competitor. Instead of tracking broad conversations with keywords, the Report stays focused on the sources you name.
Analyze a Single Link in One Report
A single-link Report collects the reviews of one page. You paste the link, choose how much data to collect, choose the classifiers and the structure, optionally select Dimensions, and review everything before Kimola creates the Report.
Step 1: Copy the Link You Want to Analyze
Open the public page you want to analyze and copy its address from the browser's address bar. This can be a product page, an app page, a business profile or a review listing of a supported platform.
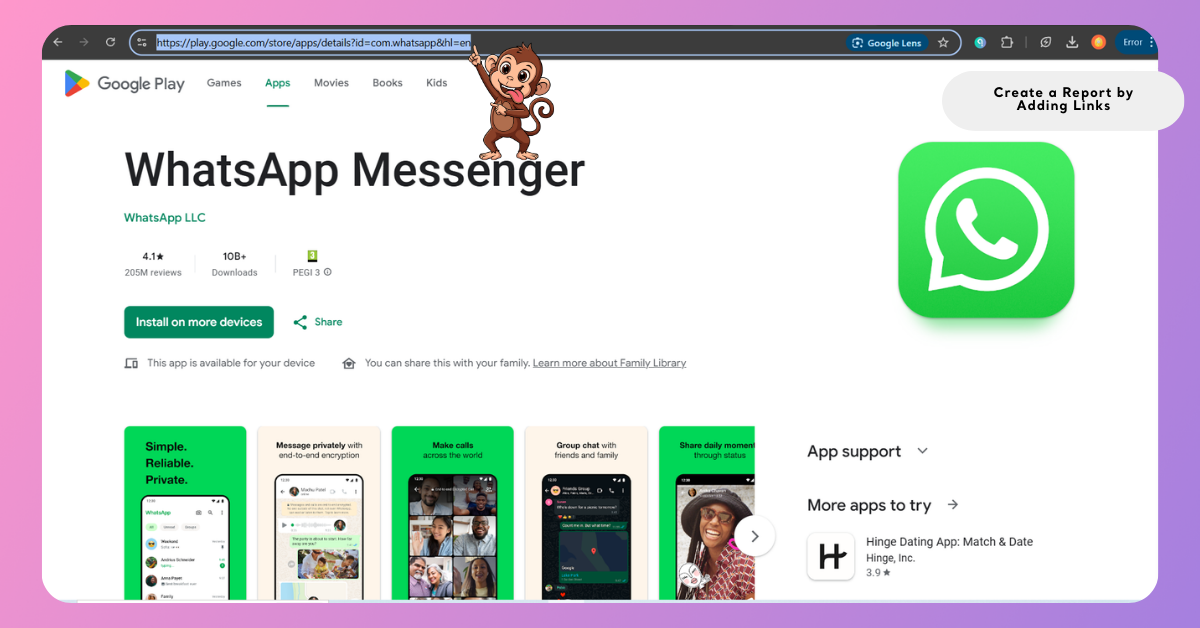
Kimola can read only the platforms it supports. For the full list and the details of each platform, see Supported Platforms for Creating Reports from Links.
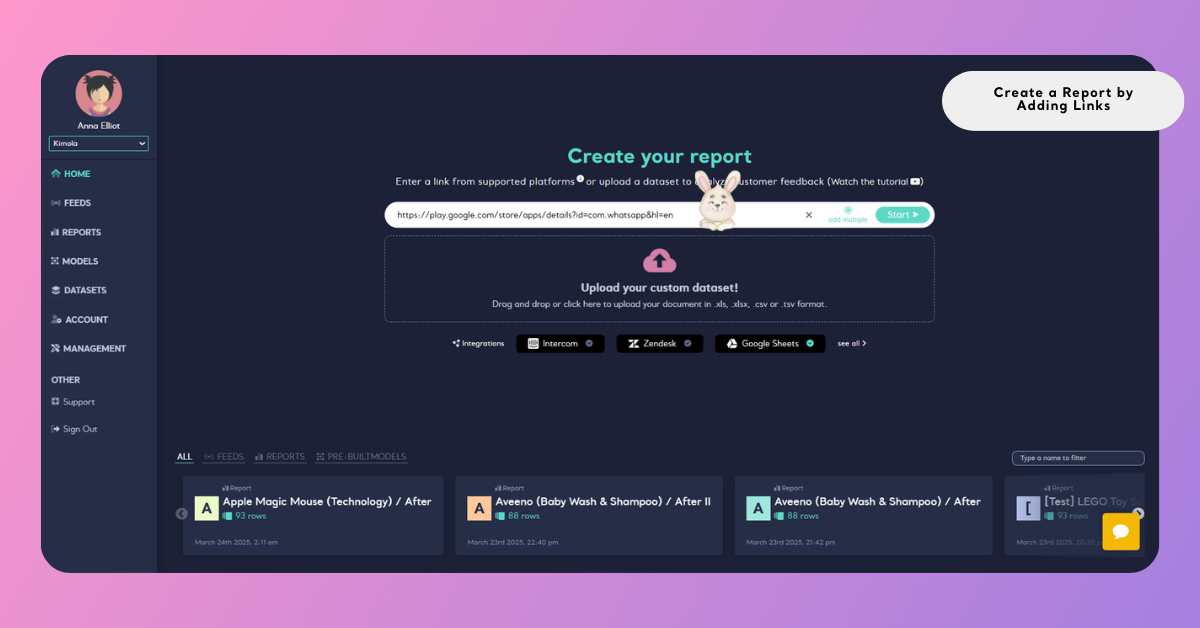
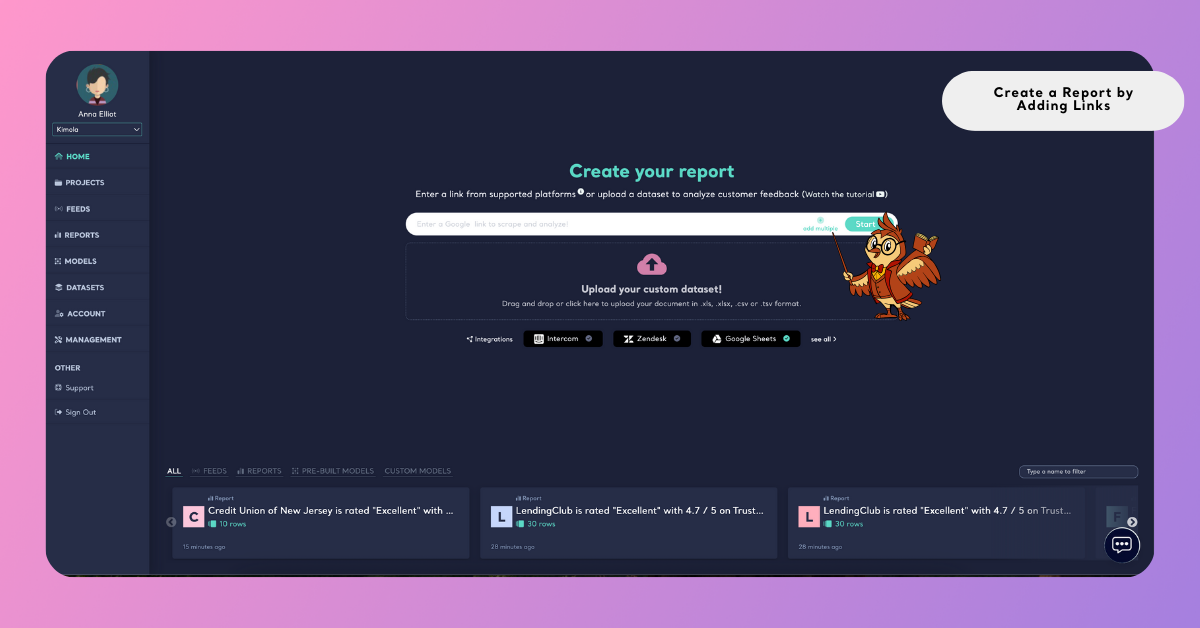
Step 2: Paste the Link and Press Start
In the report creation area, paste the copied link into the search bar and press Start. Kimola recognizes the platform from the link and prepares the dataset for analysis.
Step 3: Choose the Report Size
Move the slider to choose how many records, such as reviews or comments, the Report includes. A larger size gives the analysis more feedback to work with and uses more queries, because queries = rows × models × Dimensions.
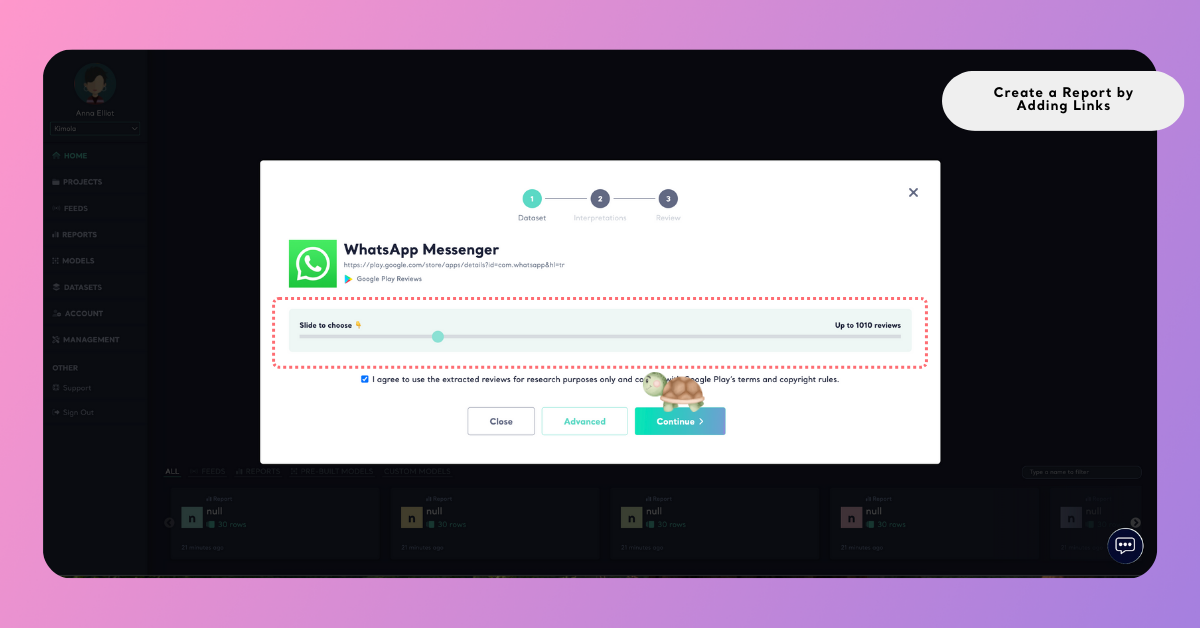
Before you continue, confirm that you agree to use the extracted reviews for research purposes only and to follow the terms and copyright rules of the platforms. The wizard shows "You must agree to the terms before continuing." until you do.
Step 4: Choose the Classifiers
Classifiers decide which labels every review receives. Choose one or more of the Automatic Classifier, which discovers the themes in your data, the Sentiment Classifier, the other pretrained models and your own custom models. Type a name in the filter box to find a model quickly. For details on each option, see Create a Report Using Automatic Classifier, Create a Report Using Pretrained Models and Create a Report Using a Custom Model.
[Screenshot: The Classifiers step with the Automatic Classifier and the Sentiment Classifier chosen]
Custom models are not available in the Starter package.
Step 5: Choose the Structure
The Structure step sets how many labels one review can receive. Turn on Enable Multi-label Classification to let Kimola assign several labels when a single review mentions different aspects, which gives a more complete view of strengths and weaknesses. Leave it off to group each review under one main theme. See Multi-label vs Single-label Classification for the difference in the results.
[Screenshot: The Structure step with the Enable Multi-label Classification switch]
A review of a cordless drill says that the tool is powerful and easy to use, but the battery drains quickly and the build quality feels cheap. With multi-label classification on, it can receive the labels Power & Performance, Ease of Use, Battery Life and Build Quality. With it off, it receives one label, such as Product Experience.
Step 6: Select Dimensions (Optional)
After the structure, you can select Dimensions to enrich the Report. A Dimension is a research question Kimola asks of every piece of feedback, such as Pain Points, which asks what goes wrong or creates difficulty. Use All, Drivers, Issues, Actors, Context and Comparisons to browse the Dimensions by group.
The Dimensions you select appear under My List on the left side, so you can review and adjust them before you create the Report.
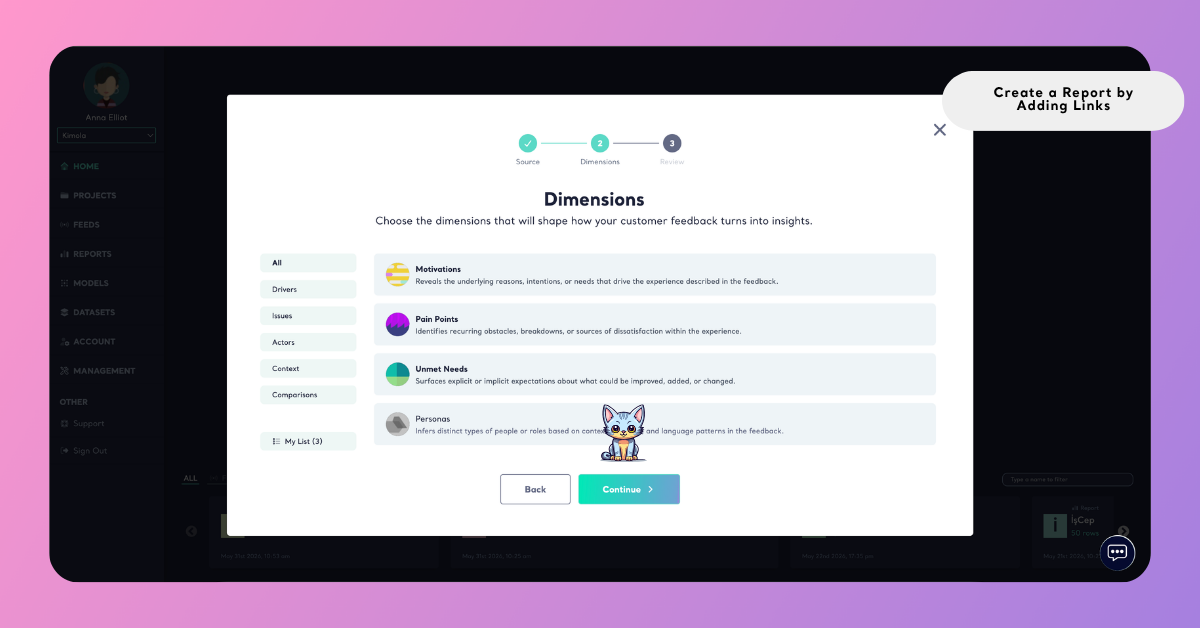
Every Dimension you select adds to the queries of the Report: queries = rows × models × Dimensions. See How to Calculate Queries for an example.
You can skip this step if you don't need Dimension results and want to create the Report right away.
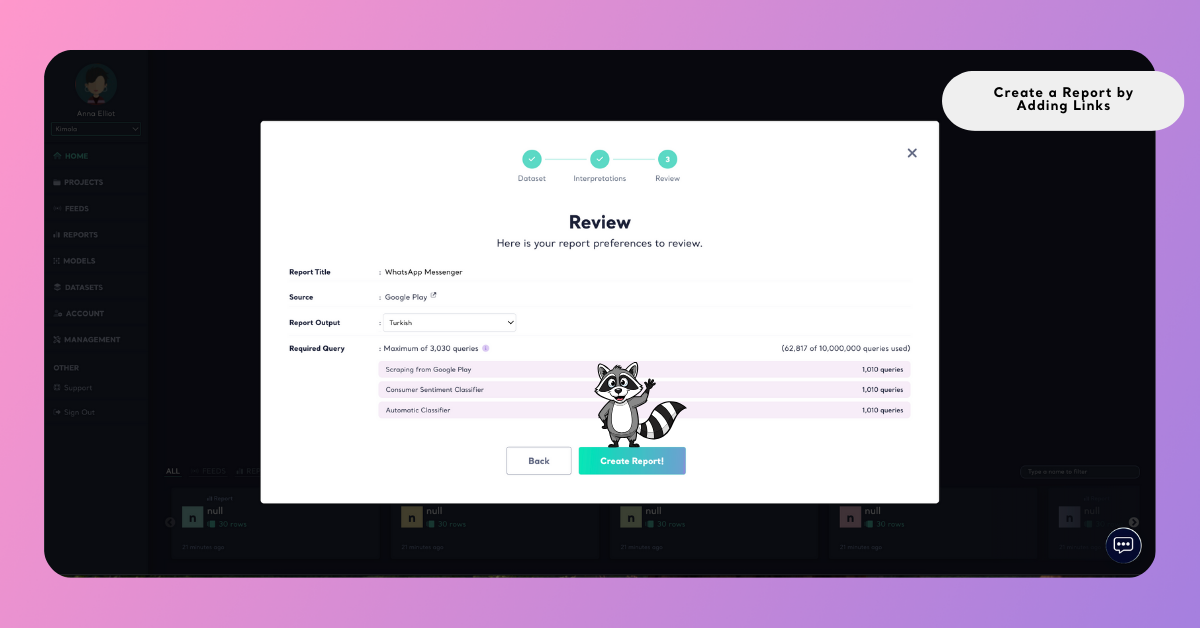
Step 7: Review and Create the Report
The Review screen summarizes the preferences of the Report before it is created.
Report Title is filled in automatically from the page you added. For a link Report, it usually matches the product, place or page title on the original platform, for example the name of an Amazon product. The title cannot be empty.
Report Language sets the language of the results, including sentiment labels, themes, summaries and Dimension results. You can choose English, Spanish, French, German, Portuguese, Dutch or Turkish. See Language Options in Reports.
Source shows the platform the data comes from, detected automatically from the link, such as Google Business, App Store or Google Play.
Required Query shows how many queries the Report will use. The number depends on the report size, the models you chose and the Dimensions you selected.
When everything looks right, click Create Report. Kimola shows the progress while it collects the customer feedback from the page, then classifies it and prepares the Report.
If the wizard says that there is no suitable package for you at the moment, it offers Contact Sales, See all plans, Upgrade Now! and Manage your package. See kimola.com/pricing for the packages.
When the Report is ready, the wizard shows "Here we go!" and "We have completed creating your report." Click View Report to open it.
[Screenshot: The final screen of the wizard with the View Report button]
Analyze Multiple Links in One Report
To analyze more than one link in a single Report, click add multiple in the search bar. The Add Links window opens.
Paste each link on a new line. Kimola checks the links and tells you whether each one is valid with "The link is valid!" or "The link is invalid.", and shows "All links are valid!" when every link passes. Use All, Valid and Invalid to filter the list, and remove or correct any invalid link before you continue.
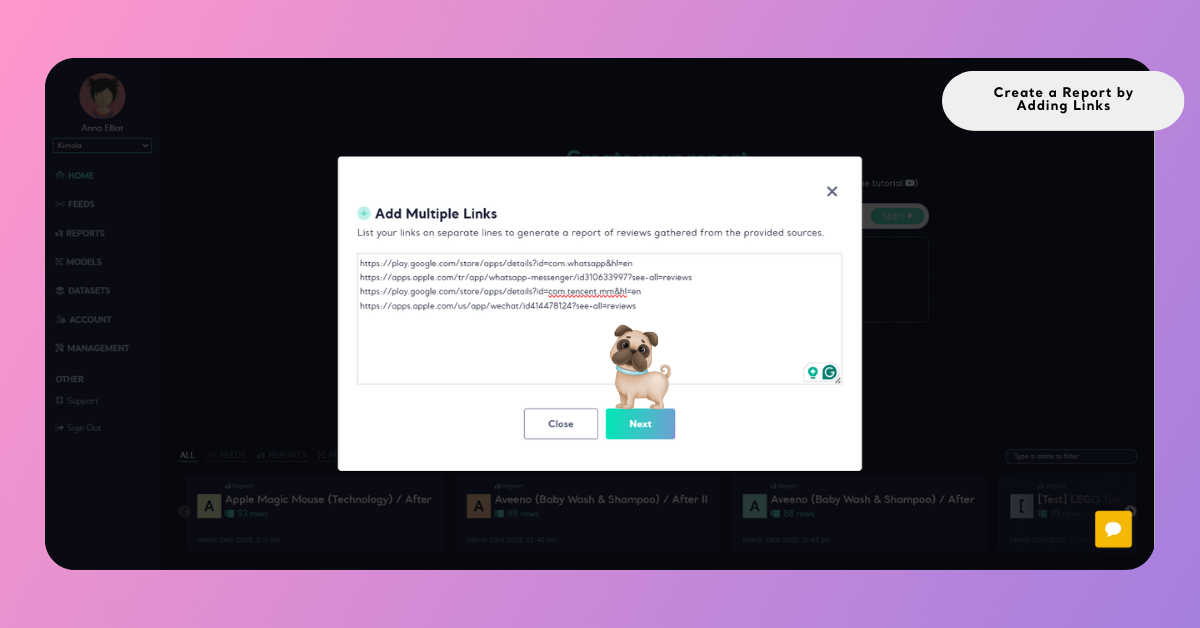
Not every platform supports multi-link analysis. The Add Links window links to the supported channels for multi-link analysis, and the same list is in Supported Platforms for Creating Reports from Links.
The rest of the wizard works as it does for a single link: report size, classifiers, structure, Dimensions and review. Kimola collects the data from all the links, combines it into one dataset and creates a single Report. On the Review screen, Sources lists every source, and you type the Report Title yourself, because a Report with several sources has no single page title to take it from. If you leave it empty, the wizard asks you to "Please type a title for your report."
This is useful when you compare the reviews of several competitor products, analyze several store locations or listings together, or review feedback from different platforms in one Report.
A hotel chain with three branches pastes the review pages of its three branches into Add Links, one per line, and names the Report "Branch reviews". The Report then shows the themes, sentiment and Dimension results of all three branches together.
After the Report Is Created
Click View Report to open the new Report, or find it on the Reports page at any time. Start with the Overview in Reports, then filter records, export the Report as an Excel file or organize it under a Project, a folder-like workspace used to group related Feeds, Reports and Models.