Organize Labels into Categories
min read - Updated on Oct 28, 2026You can group the labels of a custom model into categories, so that your Reports and Spaces show its themes under a few topics instead of one long list. Organize labels on the Models list opens a window where Kimola drafts the categories from your labels in a few seconds. You then rename and describe them, move labels between them, add or remove categories, and save. Categories don't change how feedback is classified: every piece of feedback keeps its labels, and only the way the labels are grouped on screen changes, at once and without classifying anything again.
Custom models are available in the paid packages (Basic, Standard, Business and Enterprise), not in the free Starter package. See kimola.com/pricing.
You need a content classifier with at least 4 labels, whether you created it with a prompt, a training set or a Report. Sign in to Kimola and open Models in the main menu.
Why Categories Help
A content classifier sorts feedback into the topics that matter to your business, and a model built for a whole channel can easily have 15 or 20 of them. Read as one list, those themes are hard to scan: related topics end up far apart, and nothing shows which part of the business a theme belongs to. Categories put related labels under one topic, so that, in the words of the app, "your reports read like a table of contents instead of a long list."
In a Space, the ALL THEMES card on Overview lists the model's categories, each with its number of records, its share of the feedback and its NPS: "Click a category to see its labels". Opening a category shows its labels and, in a Space, its own Insight, In this category. See Overview in Spaces. In a Report, the label filters list the labels under their categories. Labels that belong to no category are shown together under Other.
A software company's support ticket model might have labels such as Login Problems, Password Reset, User Permissions, Invoices, Plan Changes, Refunds, Integrations, Performance, Feature Requests, Response Time and Documentation. Grouped as Account and Access, Billing, Product and Support, they read as four topics, and a support lead can open Billing to see which of its three themes drives the complaints.
Categories are for content classifiers. Sentiment and Dimension models don't offer Organize labels, and neither does a content classifier with fewer than 4 labels: its labels read well on their own. A model can have up to 12 categories.
Saving, changing or removing categories doesn't classify anything again. Your feedback keeps its labels, and Reports and Spaces that use the model show the new grouping at once.
Let Kimola Draft Categories
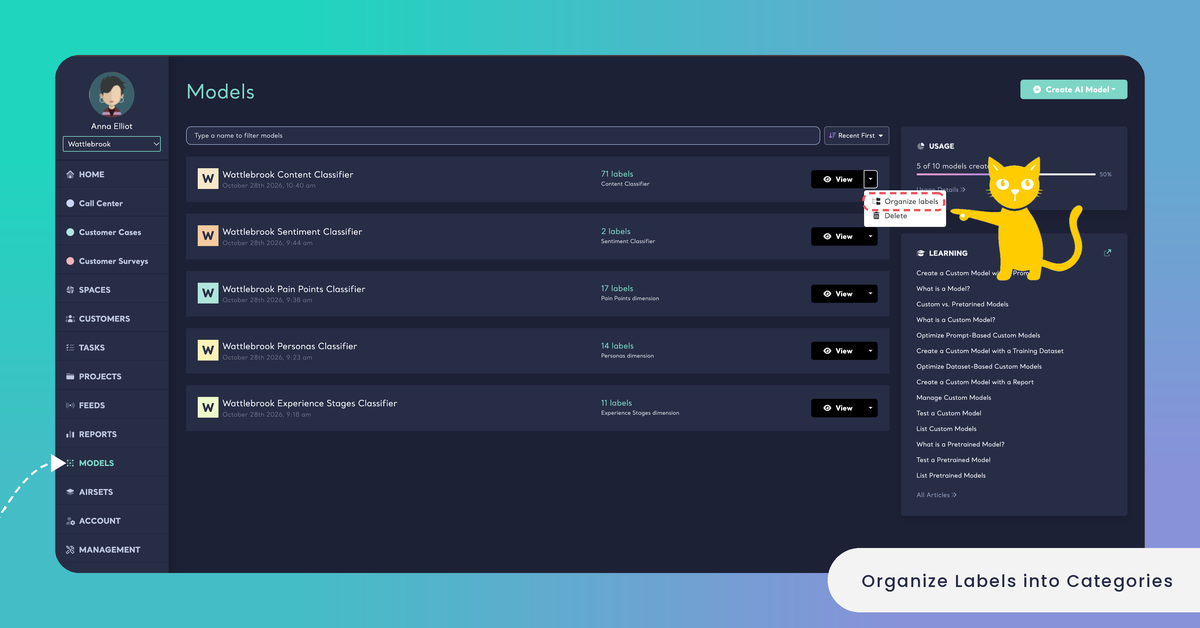
The quickest start is to let Kimola group your labels and then adjust the draft. On the Models list, open the menu next to View on the model's row and click Organize labels. Kimola opens the model's Overview with the Organize labels window on top: "Group the labels of [your model] under a few topics. Your feedback is still classified with its labels: reports read them under their new categories at once."
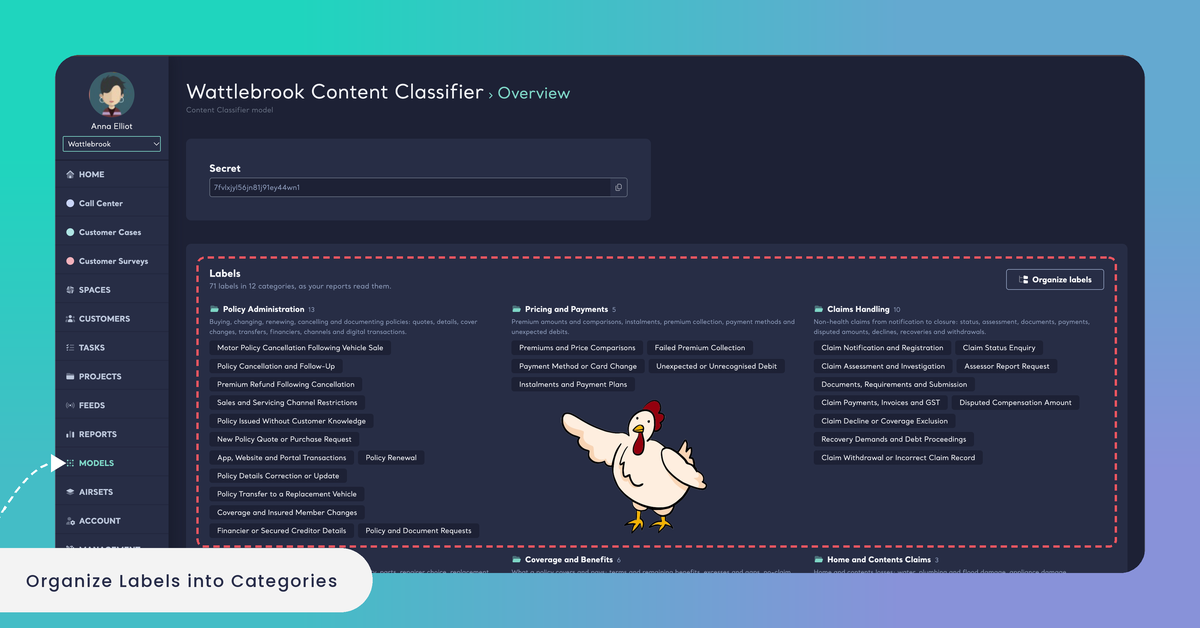
You can also open the window from the model's Overview page. The Labels card lists the model's labels, with "Group them under a few topics to read them at a glance in your reports." and an Organize labels button.
If the model has no categories yet, Kimola starts drafting as soon as the window opens: "Grouping your 15 labels into categories..." with "It takes a few seconds." The draft then appears as a list of category cards, each with a name, a short description of what customers talk about in it, its number of labels and the labels themselves. A line above the cards shows how many labels sit in how many categories, for example "15 of 15 labels in 4 categories".
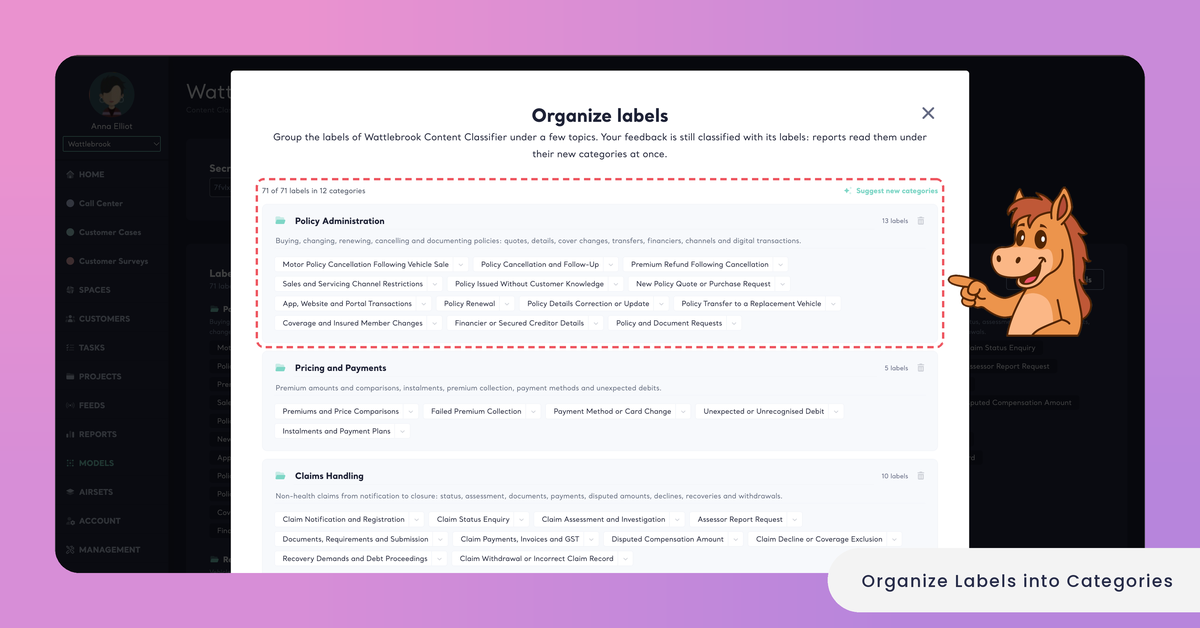
If the draft fails, the window says "Your labels could not be grouped this time." Click Try again, or Group them myself to build the categories by hand.
If you don't like the draft, click Suggest again to have Kimola draft a new set from your labels. The new draft replaces the categories in the window, together with any changes you made there. For a model that already has categories, the same link reads Suggest new categories.
Nothing in the window is saved until you click Save categories. Close or the × closes the window without saving, and the model keeps the categories it had before, or none.
Suggest again replaces your changes in the window. A draft is saved only with Save categories.
Edit Categories
A draft is a starting point. You can change every part of it before you save, and open Organize labels again later to change saved categories: the window then opens with them instead of a new draft.
Name and Describe a Category
Every category has a name and a description. Type the name in the first field of its card, and in the field below it describe what customers talk about in that category, in a sentence. Each name must be different from the others, and no category can be called Other, because Other holds the labels that fit no category.
A name that says which part of the business the category covers, such as Billing or Product, tells a reader what to expect before they open it. The description can then say where its edges are, for example "Invoices, plan changes and refunds."
Name a category after the part of the business it covers, and use its description to say where its edges are.
Move Labels Between Categories
Drag a label onto another category to move it there. You can also click the arrow on a label and choose its new category from the list, or Other (no category) to take it out of every category. A category with no labels says "Drag labels here".
Labels you keep out of every category are listed at the bottom under Other: "Labels that fit no category. Your reports show them together under Other; drag one into a category to group it."
Add or Remove a Category
Click Add a category below the cards to add an empty one, then name it, describe it and move labels into it. The counter next to the button shows how many categories the model has, for example "4 of 12 categories". A model can have up to 12.
To remove a category, click the trash icon on its card. Its labels aren't deleted: they move to Other, and you can drag them into another category.
Save Your Categories
Click Save categories. Before saving, Kimola checks every category and marks the one that needs attention, with messages such as "Name this category.", "There is another category named Billing.", "Describe Billing in a sentence: it helps the AI classify." or "Move a label into Billing, or remove it." Fix the category and click Save categories again.
When the categories are saved, the app says "The labels of [your model] are organized." The Labels card on the model's Overview then shows the labels under their categories, for example "15 labels in 4 categories, as your reports read them." If saving fails, the window says "The categories could not be saved, please try again."
Remove Categories
You can go back to reading a model's labels as one list at any time. Open Organize labels on the model and click Remove the categories at the bottom of the window ("Read the labels of this model as a single list again"). The categories are removed at once, without a confirmation, and the app says "The labels of [your model] are no more grouped." Reports and Spaces that use the model then show its labels as a single list again. The labels themselves and the classification of your feedback don't change.
The removed categories aren't kept anywhere. If you open Organize labels again later, the model has no categories, so Kimola drafts a new set from your labels.
Remove the categories works at once, without asking you to confirm, and the removed categories can't be brought back.
To take only some labels out of the grouping, keep the categories and move those labels to Other instead, or remove a single category with its trash icon and save.
You can also group a model's labels while you create it: a content classifier made with a prompt has a Categories step in its wizard. See Create a Custom Model with a Prompt.